
From Floral Wreaths to Numbers? Oh Yes! In this blog post, we’re going to explore how you can use the “Gentle Layers Floral Wreath die” by Simon Says Stamp to make beautiful and personalized floral numbers.
Let’s start with a couple of examples — the numbers 8 and 9 — and then see what other numbers you can create with the same technique!
Video & Cards Recipe
- Gentle Layers Floral Wreath Wafer Dies
- Stitching Butterflies Wafer Dies – butterflies in both cards
- Big Happy Birthday Wafer Dies -Blue Card die-cut Sentiment
- Birthday Wafer Die – Pink Card Die-cut sentiment
- Simon Says Stamp Light Weight Acetate Sheets – Ideal to add sentiments with a floating effect.
- Spellbinders Gold Cardstock for the die-cut sentiments.
- Sparkle Base to add splatters and shine.
Gentle Layers Floral Wreath
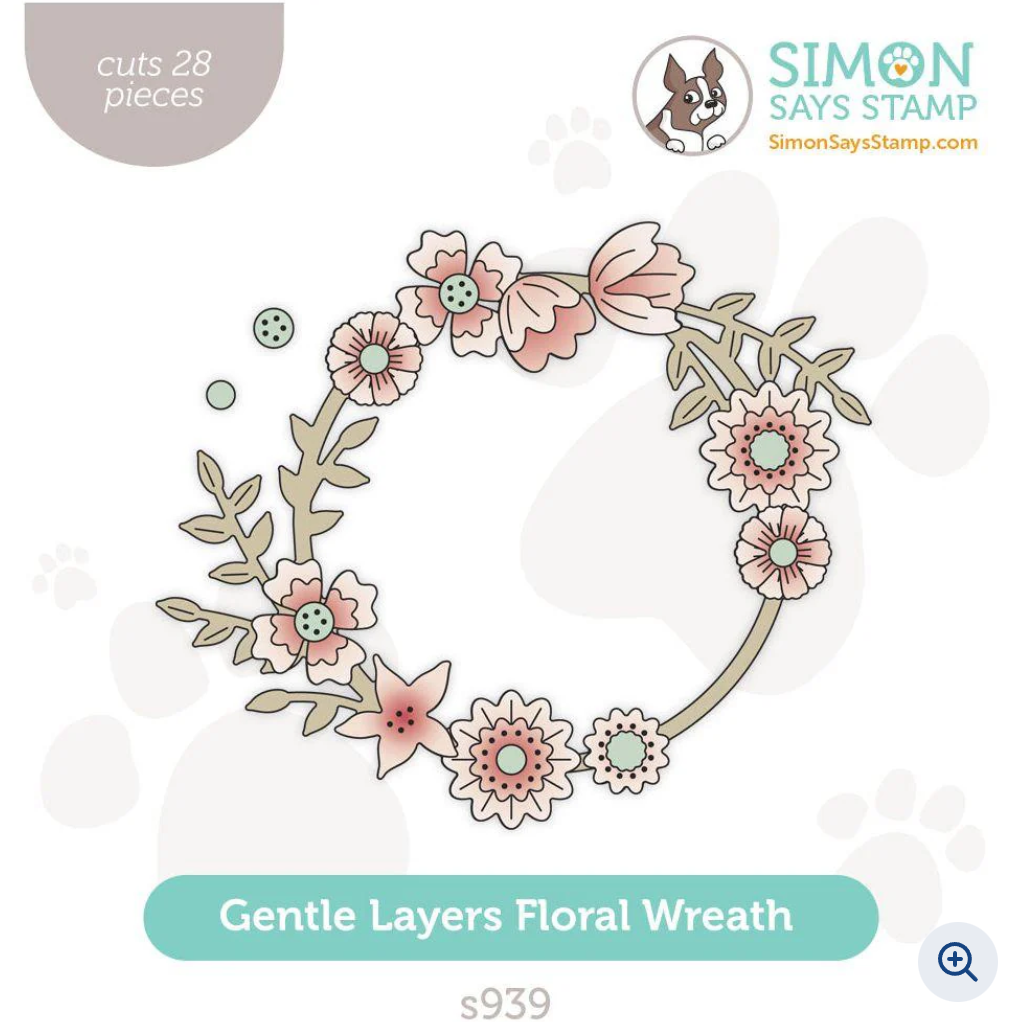
This thin wafer dies will cut all the elements to create a wreath in one go.
With its intricate floral design, this die is perfect for creating beautiful, layered elements to add depth and texture to your cards.
But what if I tell you that you can also use this die to create large numbers for birthday cards!
By creatively cropping or arranging the wreaths or the florals, you can form unique and charming floral numbers, or any other shape.
You can also use individual flowers to shape other numbers or o create different silohetes.
Number 8 – A Wreath Fit for a Celebration
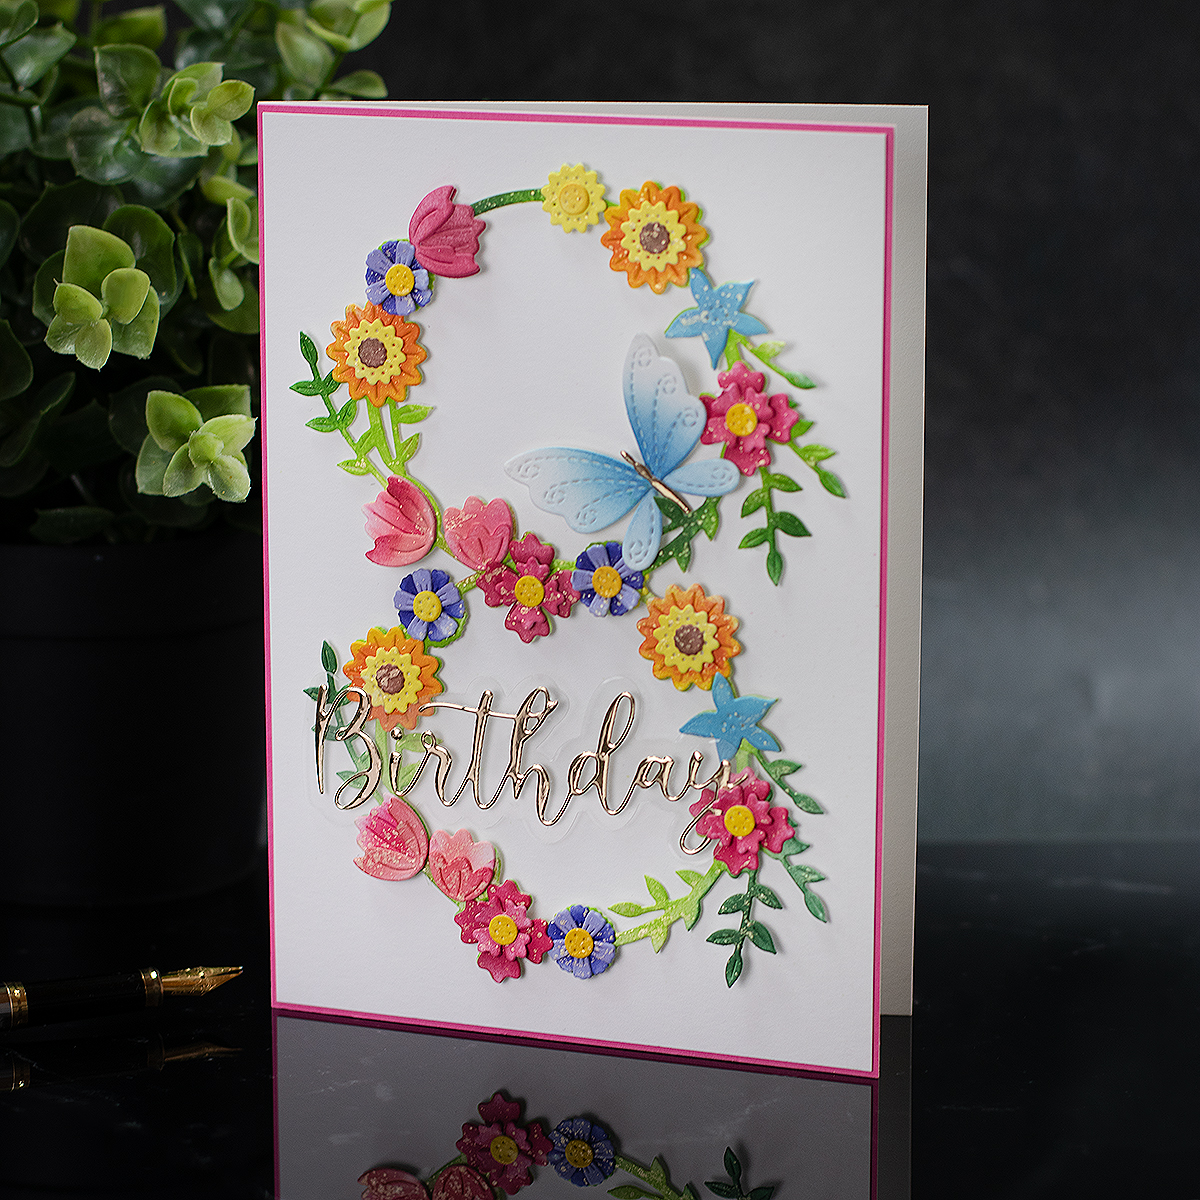
The number 8 is a great number for milestone birthdays like an 8th birthday or even an 80th celebration!
To create the number 8, cut out two floral wreaths using the “Gentle Layers Floral Wreath die“.
Arrange them side by side, slightly overlapping them in the shape of an 8.
You can either use the full wreath shape or crop a section of the wreath to form the top and bottom loops of the number. This gives you a beautiful, delicate look, full of dimension and texture.
How to Make the Number 8:
- Cut two floral wreaths using the die.
- Trim or crop one wreath into a circular shape for the top loop of the 8.
- Trim or crop the second wreath to form the bottom loop of the 8.
- Arrange the two wreaths side by side, ensuring the overlapping areas connect to form the number
- Splatter gold sparkle base for shine and interest.
Number 9 – A Floral Twist

The number 9 is another fantastic choice for birthdays, especially for anyone turning nine or a milestone birthday such as 19. You can create the number 9 using a similar method to the number 8.
For this number, you’ll crop the floral wreath to form the top loop and then partially trim another wreath to create the tail of the “9.”
How to Make the Number 9:
- Cut out 2 full floral wreaths.
- Use one of them to create the top loop of the “9”.
- For the tail of the 9, cut a smaller portion of the other wreath and position it to form a sweeping curve that mimics the tail of the number.
- Add the layering flowers .
- Spatter some sparkle base to add shine and interest.
Other Numbers You Can Create
Number 0: A great option for milestone birthdays like 10th or 100th! Simply cut two identical wreaths and position them side by side to form a circular number 0. You can layer them for dimension and detail.
Number 3: For this number, cut the wreath into smaller pieces and position the floral elements on both sides of the top and bottom of the 3. It’s an elegant way to show off the layers of the wreath.
Number 6: Much like the number 9, the number 6 can be formed by cropping a wreath into a circular shape and then adding the curved tail with the remaining floral sections. Play around with the positioning of the floral elements to create a seamless flow.
Make any other number or shape: Using only the florals in the Gentle Layers Floral Wreath die.
Have fun experimenting with different numbers and shape, and don’t forget to share your creations with fellow crafters and to tag me @bibicameron so I’ll be able to see your creations.
That’s all for today.
thanks for stopping by.
X Bibi
Thirsty for More?
Supplies
Affiliate links apply at no extra cost to you. Thanks for your support.


Leave a Reply