
Hi Crafty Friends, I’m passing by to share ideas and inspiration using the Spellbinders Club Kits – March 2025.
***These kits are monthly subscriptions ( cancel any time) and offer great value for money.
I’m loving the embossing folders this month! I couldn’t resist using hummingbird dies from the Delicate Floral Hummingbird die set to complete a couple of cards using the embossed panels.
Let me show you this 5×7 inches die set:

The Delicate Floral Hummingbird die set is one of my favourite die sets ever!
It is on sale- 50% off on the Spellbinders UK website here, and still available on Simon Says Stamp here.
I believe that once this is sold out Spellbinders won’t be producing more of them as it is the second year of their release anniversary. So grab yours if you haven’t done it already.
All the projects in this post were coloured using Bibi’s Intense Liquid Colours as these are watercolour paints, I used watercolour paper for the backgrounds and the die cuts.
For the sentiments, I used Betterpress Plates and inks in the supplies list.
Now let’s dive into easy cardmaking ideas…
3D Embossing Folder

This month’s 3D Embossing Folder is called Floral Fence of Togetherness. Its size is 5-1/2″ x 8-1/2″ so you can make a variety of card sizes.
I made a simple monochromatic A2/C6 card to show you the pattern.
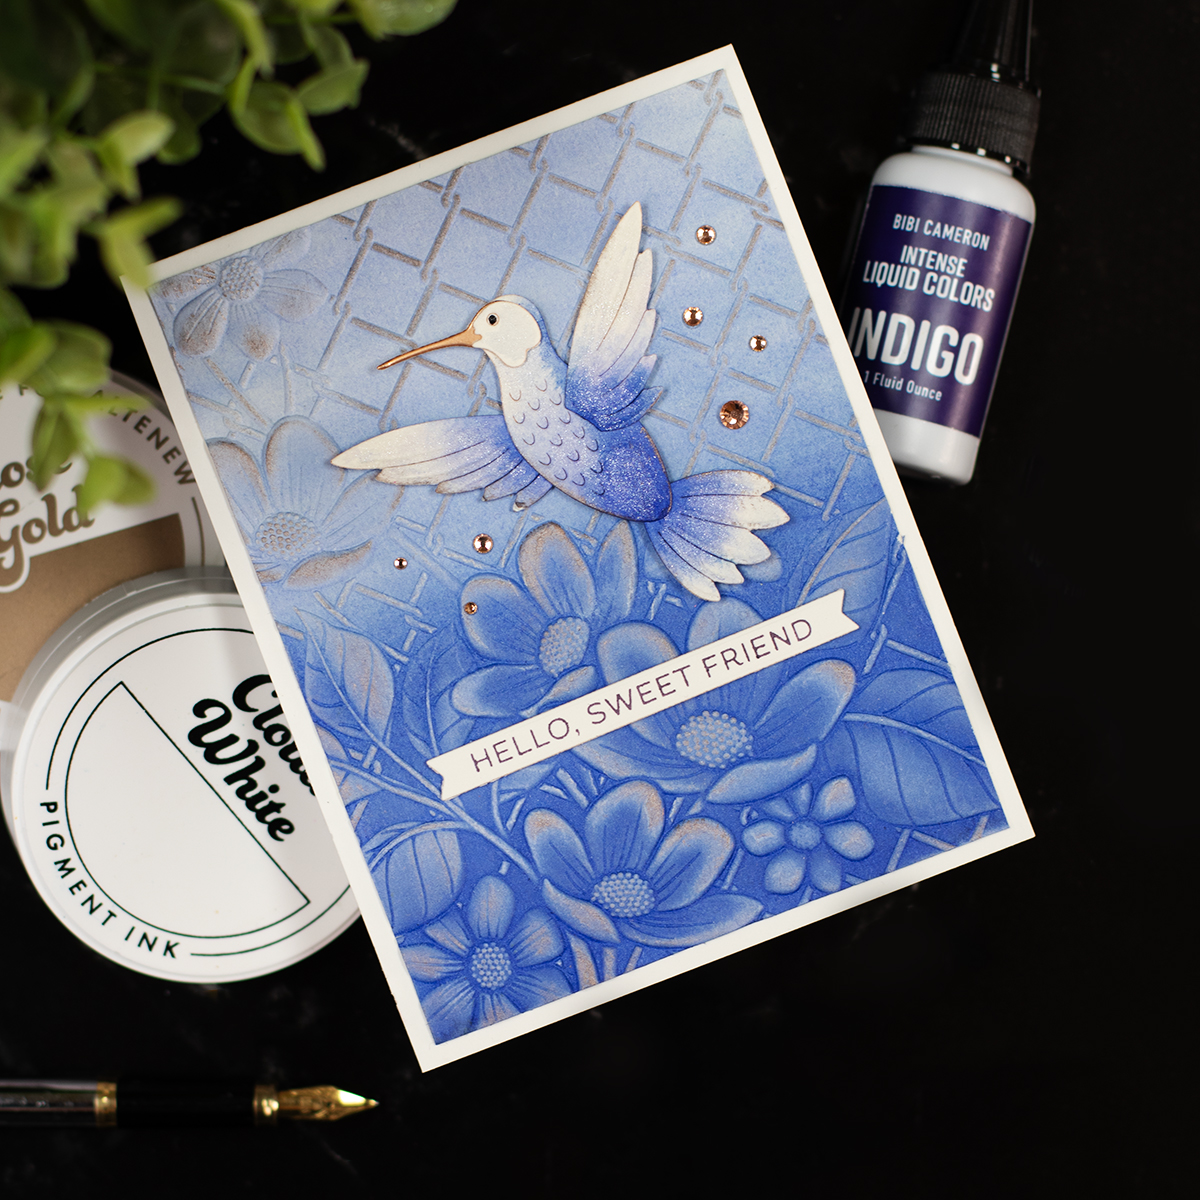
Indigo Monochromatic card
Step by Step
- Cut a piece of watercolour paper to 5-1/2″ x 4-1/4″.
- Lightly spray a little bit of water on the top portion of the panel.
This will help the paint to flow and blend smoothly when you apply it. - Take your Indigo Intense Liquid Color and apply it to the bottom portion of the panel.
Make sure the paint is more concentrated at the bottom.
Clean your brush and start working your way towards the top. - Allow the panel to dry.
- Use the embossing folder to emboss the Paper.
- Apply Altenew White Cloud Ink over the raised areas of the paper and allow it to dry.
- Repeat the process with Altenew Gold Rose Ink.
- Trim the panel 1/4″ to fit. C6/ A2 card.
- Before assembling, add Indigo Intense Liquid Color to the Hummingbird Pieces. Leave a white or a very light colour along the edges of the pieces. This will help the hummingbird “pop” against the background.
- Once the hummingbird pieces are coloured and dry, carefully assemble the bird and affix it on the panel using dimensional foam pads.
- For a touch of sparkle, add Silver Sparkle Base with a brush over the hummingbird.
- Add Spellbinders Peach Blush Gems for a bit of sparkle.
- For the sentiment I used a press plate from the Spellinders Always and Forever press plates and I used Mulberry Betterpress Ink.
Embossing Folder
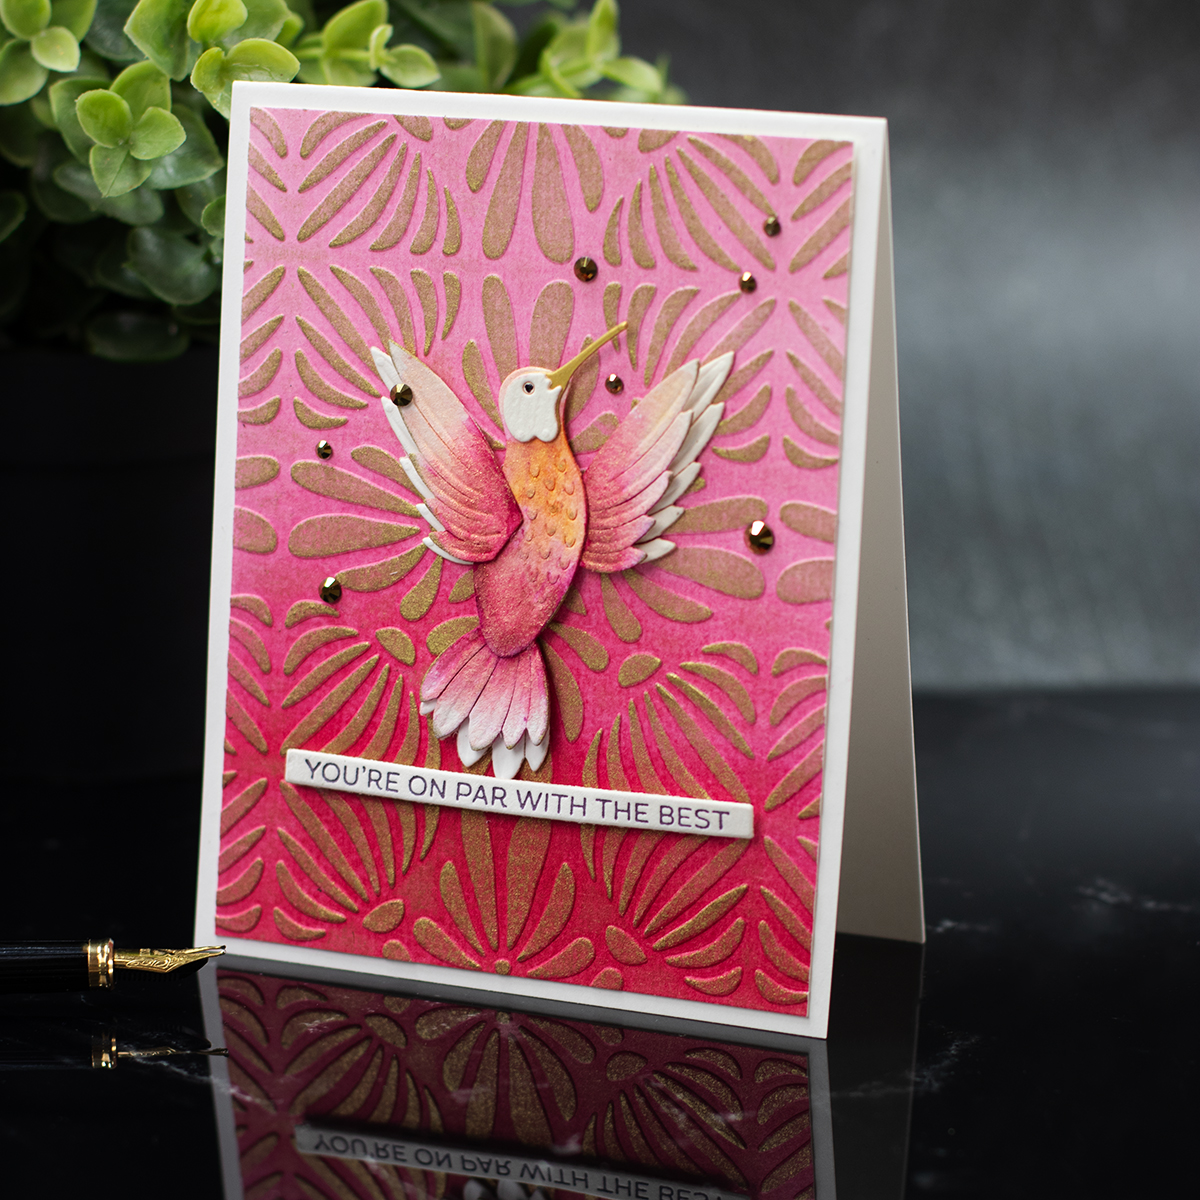
This month’s embossing clu featured the Mosaic Memories embossing folder.
This is also a large format folder and measures 5-1/2″ x 8-1/2″ so it’s great to make projects in different sizes.

Carnation and Red Monochromatic Card
step by SteP
- Cut a piece of watercolour paper to 5-1/2″ x 4-1/4″.
- Lightly spray a little bit of water on the top portion of the panel.
This will help the paint to flow and blend smoothly when you apply it. - Take your Carnation ( Pinky) and Red Intense Liquid Colors and apply it to the bottom portion of the panel.
Make sure the paint is more concentrated at the bottom.
Clean your brush and start working your way towards the top. - Allow the paper to dry and emboss using this month’s Spellbinders folder.
- Then, apply Altenew Antique Gold ink over the raised areas of the folder.
- Using the same colour paints, add colour to the hummingbird pieces before assembling. Ensure the edges remain white or very light so that the bird stands out against the background
- Affix the hummingbird on the background using dimentional foam pads.
- For a touch of sparkle, I added Gold Sparkle Base with a brush over the hummingbird and I also added Spellbinders Smoky Topaz Gems.
- Add a sentiment. I used a press plate from the Spellbinders Betterprees Club of this month and I used Mulberry Betterpress Ink.
spellbinders large die and betterpress

This month’s the Large Die is called Family & Friends Vignettes and the BetterPress Plate set is called Quilted Memories.
I paired elements of both kits to create this A2 frienship card.
For the background, I used Teal Better Press ink on Porcelain BetterPress paper and Mulberry Betterpess ink for the sentiment.
The die-cuts were colored with Bohemian Regal Intense Liquid Colors, applied with a brush to watercolor paper. I then assembled the flowers and dogs to complete the scene.”
spellbinders small die of the month

This month’s Small Die is called “Fairways & Fish Tales” and features a fisherman scene.
I kept it simple by die-cutting all the pieces of watercolour paper, then I added colours using Ocean, Lamp Black, Safron, Sephia, Umber, and Burnt Orange Intense Liquid Colors.
For background, I added to this scene a stencilled mountain created with Majestic Mountain Stencils by Altenew and 4 different ink colours.
As I used watercolour paper for this, the image doesn’t look as clear as it could but this was the look and feel I was aiming for.
That’s all for today.
I hope you have enjoyed this post.
X
Bibi
Thirsty For More?
supplies
Affiliate links apply at no extra cost to you. Thanks for your support.


Leave a Reply